
You can send a real Bitcoin transaction from a Python script in about five lines of code. The harder part — the part that separates copying a snippet from building something that survives production — is understanding what those five lines actually do. This guide walks the full path, from your first wallet to signing a raw transaction by hand and talking to the network at the protocol level.
We’ll start simple with a library that hides the details, then peel back each layer: how a transaction is really structured, how it gets signed, and how your code reaches the network. Everything here runs on Bitcoin’s test network, so you can experiment without risking a cent. Let’s get into it.
What a Bitcoin Transaction Really Is
Before writing any code, it helps to know what you’re building. A Bitcoin transaction doesn’t “move” coins the way a bank transfer shifts a balance. It consumes previous outputs and creates new ones — nothing more, nothing less.
As Andreas M. Antonopoulos writes in Mastering Bitcoin, “Transactions are the most important part of the Bitcoin system. Everything else in Bitcoin is designed to ensure that transactions can be created, propagated on the network, validated, and finally added to the global ledger of transactions.” Every line of Python you write is in service of that one object.
UTXO (Unspent Transaction Output): a chunk of bitcoin locked to an address that hasn’t been spent yet. Your wallet balance is simply the sum of the UTXOs you control. A transaction spends whole UTXOs as inputs and produces fresh UTXOs as outputs.
Inputs, Outputs, and Change
Every transaction has inputs (the UTXOs you’re spending) and outputs (where the value goes). If an input is larger than the amount you want to send, you add a second output that pays the remainder back to yourself. That’s change — the same idea as getting coins back from a cash payment.
Whatever you don’t assign to an output becomes the miner fee. There’s no separate “fee” field anywhere in the format; the fee is just inputs minus outputs. In mid-2026 the average Bitcoin fee sits around $0.82, though it swings sharply with demand.
Why It Needs a Signature
To spend a UTXO, you prove ownership with a digital signature made from your private key. Miners and the wider network check that signature before accepting the transaction into a block. Get the signing wrong and the network silently rejects it — which is precisely why the “easy” libraries exist.
What You Need Before You Start
You need Python 3.7 or newer, a code editor, and a python bitcoin library (we’ll compare three). You also need test coins, which brings us to the testnet.
Testnet: a parallel Bitcoin network that behaves like the real one but uses valueless coins, so developers can test freely. Never send real BTC to a testnet address — it’s gone for good.
One update worth knowing before you begin. The long-running testnet3 has been replaced by testnet4, defined in BIP94 and shipped in Bitcoin Core 28.0 in late 2024. Testnet4 fixes the difficulty-reset exploits that made testnet3 unstable, and current releases select it with the -testnet4 flag. Grab free coins from a testnet4 faucet before writing your first send.
The Quick Way: Send Bitcoin With the bit Library
The fastest route to a working transaction is the bit library, which folds key generation, fee estimation, signing, and broadcasting into single method calls. Install it with one command:
bash
pip install bitCreate a testnet wallet like this. The WIF (Wallet Import Format) string is your private key in a portable form — save it, or you’ll generate a brand-new wallet on every run:
python
from bit import PrivateKeyTestnet

key = PrivateKeyTestnet()
print(key.address)   # your testnet address
print(key.to_wif())  # save this to reuse the wallet
Reload the same wallet later by passing the WIF back in: key = PrivateKeyTestnet('your-wif-here'). Now fund the address from a faucet, wait for one confirmation, and read the balance:
python
key = PrivateKeyTestnet('your-wif-here')
print(key.get_balance('btc'))
Sending is a single call. The send() method takes a list of outputs, so you can pay several recipients in one transaction — here we send a small amount to one example testnet address:
python
outputs = [('mkH41dfD4S8DEoSfcVSvEfpyZ9siogWWtr', 0.0001, 'btc')]
tx_hash = key.send(outputs)
print(tx_hash)  # look this up on a testnet explorer
Here’s the catch. bit is delightfully simple, but its last release — version 0.8.0 — landed in December 2021, and it was built around the older testnet3 backends. For a quick demo it’s perfect. For anything you plan to maintain, reach for a library that still ships updates.
| Library | Best for | Actively maintained | Level |
|---|---|---|---|
| bit | Your fastest first transaction | No (last release 2021) | Beginner |
| bitcoinlib | Wallets and production apps | Yes | Intermediate |
| python-bitcoinlib | Low-level protocol and wire messages | Yes | Advanced |
A More Maintained Path: bitcoinlib
When you outgrow bit, bitcoinlib (maintained by 1200wd) is the natural next step. It’s actively developed, supports modern address types like Bech32/SegWit, manages HD wallets, and can talk to an external provider so you don’t have to sync the whole chain locally.
A minimal send looks like this. The library creates the wallet, tracks its UTXOs, and assembles the transaction for you:
python
from bitcoinlib.wallets import Wallet

w = Wallet.create('DemoWallet', network='testnet')
print(w.get_key().address)     # fund this from a faucet
w.scan()                       # refresh UTXOs
w.send_to('tb1q...', 10000)    # amount in satoshis
The trade-off is a larger API surface. In return you get SegWit support, multisig, and the freedom to point the library at an endpoint of your choice — which matters the moment you leave testnet for real value.
Under the Hood: A Transaction From Scratch
Libraries are wonderful until something breaks and you have no idea why. To truly understand Bitcoin with Python, it’s worth building a transaction the hard way at least once. Andrej Karpathy’s from-scratch tour of Bitcoin in Python is the classic walkthrough, and the steps break down cleanly.
First you generate a private key — really just a large random number — and derive the public key from it using the secp256k1 elliptic curve. Hashing that public key and encoding the result (Base58Check for legacy addresses, Bech32 for SegWit) produces your address.
Then you assemble the transaction: reference the UTXOs you’re spending as inputs, define your outputs, and leave the difference as the fee. Each input carries a script that will later unlock the coins it points to.
Signing is the delicate part. You serialize the transaction, hash it, and produce an ECDSA signature over that hash, tagged with SIGHASH_ALL to commit to every input and output. Swap the signature and public key into the input scripts, serialize the whole thing to raw hex, and it’s ready to broadcast. It’s fiddly — one misplaced byte means rejection — but doing it once demystifies every library call you’ll ever make afterward.
Talking to the Network: The P2P Wire Protocol
There’s a deeper layer still: the peer-to-peer wire protocol that clients use to gossip transactions and blocks. This is where python-bitcoinlib shines, exposing message classes that mirror Bitcoin Core’s own — including the ones defined in files like msg_filteradd.py in the Python wire message set.
msg_filteradd (BIP37): a P2P wire message that adds a single data element to a connection’s Bloom filter. Lightweight clients use it so peers return only the transactions relevant to their addresses, instead of the entire block stream.
A few rules govern this. The data you add must be 520 bytes or smaller, and Bloom filters are append-only — there is no filterremove, because you can’t pull an item out without rebuilding the filter from scratch. You set an initial filter right after the version handshake, then use filteradd to extend it element by element.
Why care about this? It’s the machinery behind light wallets that watch specific addresses without downloading the whole chain. Working at this level in Python — with msg_filteradd, msg_version, and the rest of the wire vocabulary — is how you build custom network tooling rather than just firing off payments.
From a Transaction to Your Own Cryptocurrency in Python
Once you can build and sign transactions, a common next question is how to create your own cryptocurrency with Python. There are two honest answers, and they differ enormously in scope.
The lightweight route is a token: you deploy a smart contract on an existing chain — an ERC-20-style token, for example — where Python handles deployment and interaction rather than consensus. The heavyweight route is a genuinely new coin, which means forking Bitcoin’s codebase or writing your own client software, complete with a consensus layer, a peer network, and a genesis block.
For learning, many developers write a toy blockchain in Python: a chain of hashed blocks, a proof-of-work loop, and a simple transaction pool. It won’t secure real value, but it makes the moving parts concrete. Just don’t confuse a teaching model with a production network — the distance between them is vast.
How to Connect Your Python App to Bitcoin
Every example above eventually has to reach the live network to broadcast a transaction or read a balance. You have two options. Self-host the full Bitcoin software (bitcoind), which means downloading the entire chain — hundreds of gigabytes — and keeping it online. Or connect to a hosted endpoint and skip the maintenance entirely.
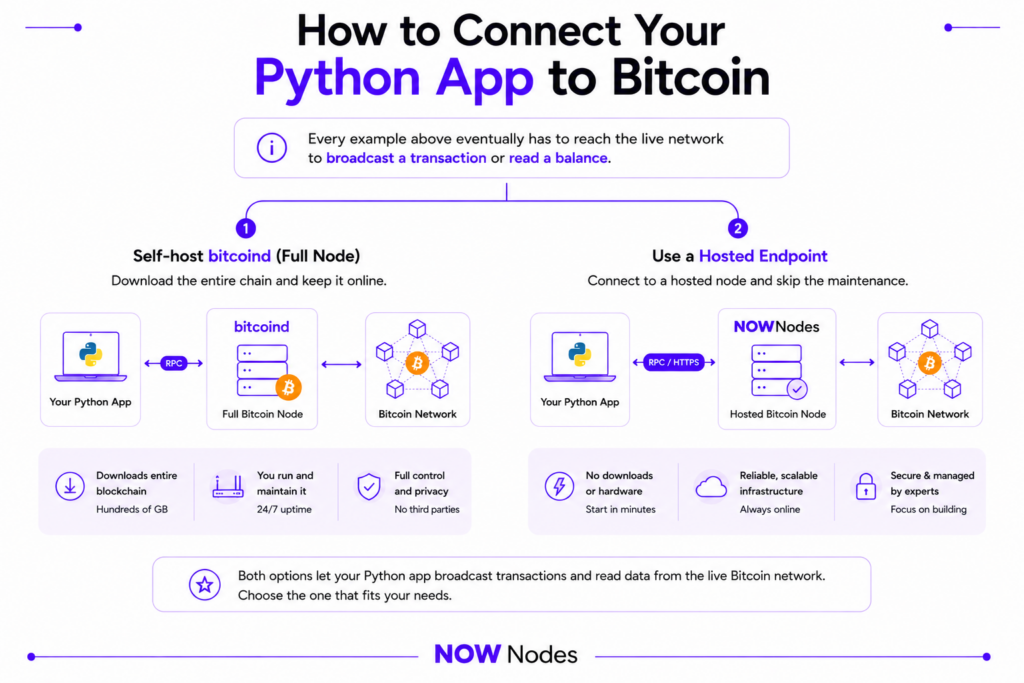
NOWNodes takes the second approach. You get an API key and a ready endpoint that your Python script points at, with RPC and REST (Blockbook) access across 120+ networks, Bitcoin and its testnet included. The free personal plan allows up to 20,000 requests a day — plenty for development and testing.
Pointing Python at it is a normal HTTP request. You post a JSON-RPC payload to the endpoint with your API key in the header:
import requests

url = "https://btc.nownodes.io/"
headers = {"api-key": "YOUR_API_KEY", "Content-Type": "application/json"}
payload = {"jsonrpc": "2.0", "id": "1", "method": "getblockchaininfo", "params": []}

response = requests.post(url, json=payload, headers=headers)
print(response.json())
That keeps your code focused on wallet and transaction logic instead of infrastructure you’d otherwise babysit yourself. It also lets you switch between mainnet and testnet4 by changing a single endpoint, with no re-syncing involved.
Best Practices and Common Pitfalls
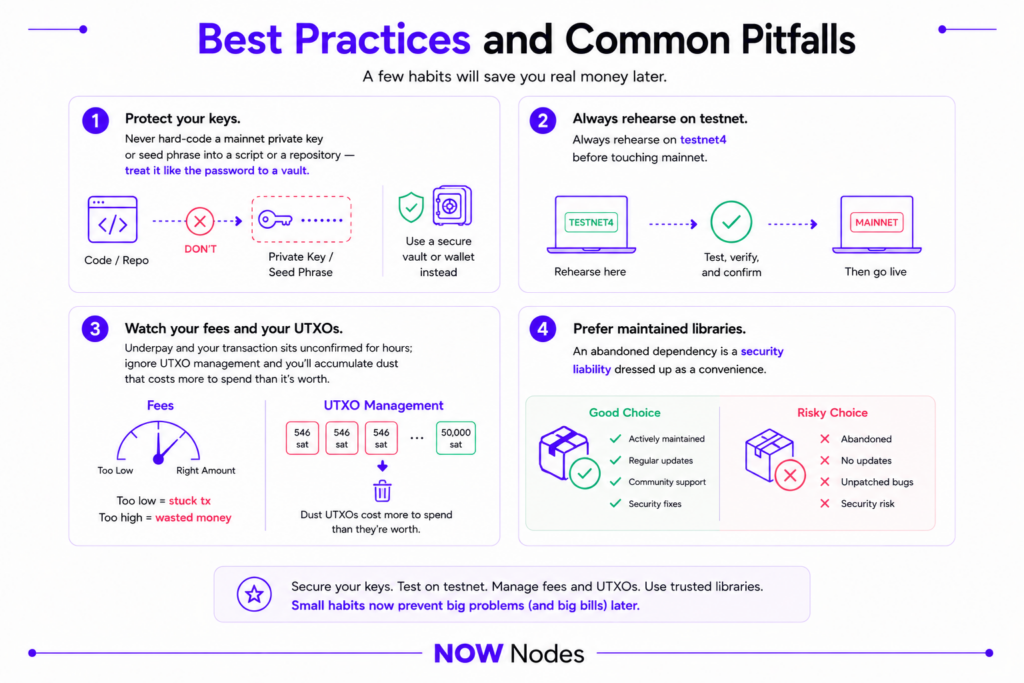
A few habits will save you real money later. Never hard-code a mainnet private key or seed phrase into a script or a repository — treat it like the password to a vault, because that’s exactly what it is. Always rehearse on testnet4 before touching mainnet.
Watch your fees and your UTXOs. Underpay and your transaction sits unconfirmed for hours; ignore UTXO management and you’ll accumulate dust that costs more to spend than it’s worth. And prefer maintained libraries — an abandoned dependency is a security liability dressed up as a convenience.
Conclusion
Making a Bitcoin transaction with Python can be a five-line exercise or a deep dive into elliptic curves and wire messages — and the useful truth is that you’ll want both. Start with bit to watch a transaction actually land, move to bitcoinlib for anything real, and read the from-scratch version once so the magic turns into mechanics you understand.
The one piece you can’t skip is network access. Whether you self-host bitcoind or plug into a hosted endpoint, your Python code is only as reliable as its connection to Bitcoin. Get that right, keep your keys safe, and everything else is just code.
FAQ
Can you really send Bitcoin with Python?
Yes. With a library like bit or bitcoinlib you can generate a wallet, sign, and broadcast a transaction in a handful of lines. The library handles the key math and serialization; you supply the recipient and the amount.
Which Python Bitcoin library is best?
It depends on your goal. bit is the simplest for a first transaction, bitcoinlib is the better-maintained choice for wallets and production apps, and python-bitcoinlib gives you low-level access to Bitcoin’s data structures and P2P wire protocol.
Is the bit library still maintained?
Not actively — its last release, 0.8.0, shipped in December 2021. It still works for simple demos, but for current projects, and especially for testnet4, a maintained library or a hosted endpoint is the safer bet.
What is testnet4 and why does it matter?
Testnet4 is Bitcoin’s current test network, defined in BIP94 and added in Bitcoin Core 28.0 in 2024. It replaced testnet3, which suffered from difficulty-reset exploits. Use a testnet4 faucet to get free, valueless coins for testing.
What is msg_filteradd.py in Bitcoin’s Python wire protocol?
It’s a P2P wire message class (BIP37) that adds a data element to a connection’s Bloom filter. Light clients use msg_filteradd so peers return only relevant transactions. The data must be 520 bytes or smaller, and the filter is append-only.
Can you create your own cryptocurrency with Python?
Partly. Python is well suited to deploying and interacting with tokens on existing chains, and to writing a toy blockchain for learning. A real independent coin usually means forking Bitcoin’s codebase and running your own consensus network — far more than a single script.
Do I need to run the full Bitcoin software to send a transaction?
No. You can broadcast through a hosted endpoint instead of downloading the whole chain. A provider like NOWNodes gives you an API endpoint so your Python code can send and query without self-hosting bitcoind.
How much does a Bitcoin transaction cost?
The fee equals inputs minus outputs, set by you and paid to miners. In mid-2026 the average fee is roughly $0.82, but it rises and falls with network demand, so estimate before you send.