
A Solana wallet adapter is a set of open-source TypeScript packages that lets your web app talk to whichever wallet a user already has, whether that’s Phantom, Solflare or Backpack. You wrap the app in three React providers, drop in a connect button, and read the user’s public key with one hook. You write no per-wallet code.
That is still the setup a large share of Solana front ends run on, but the surrounding advice has aged badly. The Solana docs now call the older stack, @solana/web3.js v1 plus wallet-adapter, legacy for new work, and the dApp Scaffold that most tutorials tell you to clone was archived on January 7, 2025. Below is the setup that works as of September 2026, and a clear rule for when to use something else.
What Is a Wallet Connection Library for Solana?
It is the layer between your interface and the user’s wallet extension or mobile app. The Solana wallet adapter is maintained by Anza and described in its own README as “modular TypeScript wallet adapters and components for Solana applications.” It has roughly 2,000 GitHub stars and is licensed under Apache-2.0.
“Modular” means you install only the parts you need. For a React app that is usually four packages:
| Package | What it does | Latest on npm (Sept 2026) |
|---|---|---|
@solana/wallet-adapter-base | Adapter interfaces, error types, shared utilities | 0.9.28 |
@solana/wallet-adapter-react | ConnectionProvider, WalletProvider, and hooks such as useWallet | 0.15.40 |
@solana/wallet-adapter-react-ui | Connect modal, WalletMultiButton, default styles | 0.9.40 |
@solana/wallet-adapter-wallets | Bundle of legacy per-wallet adapters (optional now) | 0.19.39 |
Versions and requirements come from the npm registry. All four require Node 20 or newer and list @solana/web3.js ^1.99.0 as a peer dependency. Older guides that tell you to stay on React 17 are out of date: the current packages accept any React version.
Why Do dApps Need One?
Because every wallet used to expose its own browser API, and each one behaved slightly differently. Supporting ten wallets meant writing ten integrations, then keeping them alive as wallets changed.
The Solana wallet adapter builds on two standards that removed most of that work. The Wallet Standard, which Phantom notes was “pioneered on Solana,” has wallets register themselves with the page through events, so apps discover them without hard-coding names. The Solana Mobile Stack’s Mobile Wallet Adapter protocol does the same job for mobile wallets.
The practical result is stated in the official app guide: wallets that implement either standard “will be available automatically.” Your wallets list only needs entries for old wallets that support neither.
“For any wallet injected into the window in a browser, browser extension, or mobile app, you no longer need to publish an adapter at all.” — Anza, wallet-adapter documentation for wallet developers
Who Uses It, and for What?
Anyone whose users hold their own keys. The wallet signs, your app never sees a private key, and the Solana wallet adapter is the handshake that makes that possible.
- DeFi and trading front ends that need the user’s public key and a way to request signatures.
- NFT mints and marketplaces, where “connect, then approve one transaction” is the whole flow.
- Games and consumer apps that read token balances for the connected address.
- Wallet developers, who use the same repo’s guide to make their wallet discoverable.
If your app only reads public data, such as an explorer or a dashboard for a pasted address, you don’t need it at all. A plain connection to the network is enough.
How Does the Connection Flow Work?
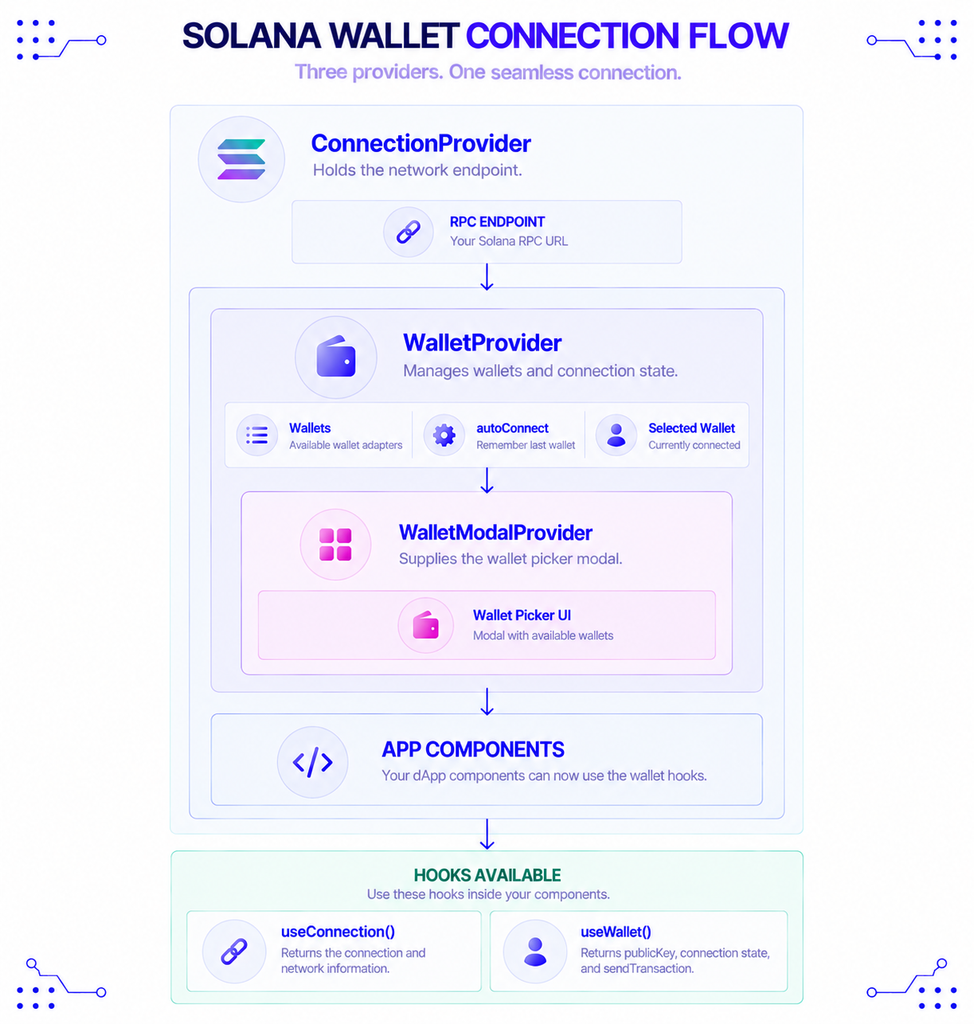
With the Solana wallet adapter, your app nests three providers, and every component inside can then call two hooks. The order matters, because each layer depends on the one above it.
ConnectionProviderholds the network endpoint, the URL your app uses to read chain data and submit transactions.WalletProviderholds the wallet list and theautoConnectsetting, and tracks which wallet is selected.WalletModalProvidersupplies the wallet-picker modal thatWalletMultiButtonopens.
Inside that tree, useConnection() returns the connection and useWallet() returns the publicKey, connection state, and sendTransaction. Behind the scenes, the app announces itself with an app-ready event and wallets answer with register-wallet, per Phantom’s Wallet Standard docs. You never touch that handshake directly.
How to Add Wallet Connect to a Next.js App
This takes about ten minutes on a fresh project. The steps follow the official quick setup, adapted for the Next.js App Router.
- Create the project with Node 20+ installed:
npx create-next-app@latest my-dapp. - Install the packages:
npm install @solana/wallet-adapter-base @solana/wallet-adapter-react @solana/wallet-adapter-react-ui @solana/web3.js@^1.99.0. - Create
components/WalletProviders.tsxwith the code below. - In
app/layout.tsx, wrap{children}with<WalletProviders>. - Render
<WalletMultiButton />from@solana/wallet-adapter-react-uion any page. - Switch your wallet to Devnet, fund it from a Solana faucet, and click the button.
tsx
"use client";
import { useMemo, type ReactNode } from "react";
import { ConnectionProvider, WalletProvider } from "@solana/wallet-adapter-react";
import { WalletModalProvider } from "@solana/wallet-adapter-react-ui";
import { clusterApiUrl } from "@solana/web3.js";
import "@solana/wallet-adapter-react-ui/styles.css";

export function WalletProviders({ children }: { children: ReactNode }) {
  const endpoint = useMemo(
    () => process.env.NEXT_PUBLIC_SOLANA_ENDPOINT ?? clusterApiUrl("devnet"),
    []
  );
  return (
    <ConnectionProvider endpoint={endpoint}>
      <WalletProvider wallets={[]} autoConnect>
        <WalletModalProvider>{children}</WalletModalProvider>
      </WalletProvider>
    </ConnectionProvider>
  );
}
The empty wallets array is deliberate: Wallet Standard wallets appear on their own. The "use client" line matters because these providers use browser state. If Next.js reports a hydration mismatch on the button, a commonly used fix is loading it with next/dynamic and ssr: false.
How to Send a Transaction From the Connected Wallet
Call sendTransaction from useWallet(). It is the one signing method every wallet supports, so build your first feature on it.
tsx
"use client";
import { useConnection, useWallet } from "@solana/wallet-adapter-react";
import { PublicKey, SystemProgram, Transaction } from "@solana/web3.js";

export function SendButton({ to }: { to: string }) {
  const { connection } = useConnection();
  const { publicKey, sendTransaction } = useWallet();

  const onClick = async () => {
    if (!publicKey) return;
    const tx = new Transaction().add(
      SystemProgram.transfer({
        fromPubkey: publicKey,
        toPubkey: new PublicKey(to),
        lamports: 1_000_000, // 0.001 SOL
      })
    );
    const { context: { slot: minContextSlot }, value: { blockhash, lastValidBlockHeight } } =
      await connection.getLatestBlockhashAndContext();
    const signature = await sendTransaction(tx, connection, { minContextSlot });
    await connection.confirmTransaction({ blockhash, lastValidBlockHeight, signature });
  };

  return <button onClick={onClick} disabled={!publicKey}>Send 0.001 SOL</button>;
}
One warning from the project’s FAQ: signTransaction, signAllTransactions and signMessage are optional wallet features. Check that they exist before calling them, or you’ll get “is not a function” errors for some wallets.
Which Endpoint Should the Connection Use?
The Solana wallet adapter accepts any endpoint URL, so the choice is yours. Use Solana’s public URL while you build, and a private endpoint before real users arrive. The default clusterApiUrl("devnet") is free, but the clusters documentation caps each IP at 100 requests per 10 seconds, with a 40-request limit for a single method. Solana’s own production guide says plainly not to use public endpoints in production.
For that step, a managed provider keeps you from running your own server. NOWNodes serves Solana over HTTPS and WebSocket with an API key; its Solana page lists mainnet, so keep devnet work on Solana’s public URL. The free Start plan includes 100,000 requests, and the Solana docs list the supported methods.
Here’s the catch most tutorials skip. Anything prefixed NEXT_PUBLIC_ is inlined into the browser bundle, so a provider key placed there is visible to every visitor. Route requests through your own server endpoint, or restrict the key at the provider, before you ship.
Is the dApp Scaffold Still Worth Using?
Use it to read, not to build on. The dApp Scaffold bundles wallet connection, state management, sample components and notifications into a Next.js project, which made it a fast start for years. It is now a read-only archive, so it will not receive dependency updates or security fixes.
| Option | Maintained | Best for | Trade-off |
|---|---|---|---|
| dApp Scaffold | No, archived Jan 2025 | Studying a working project layout | Frozen dependencies; README warns mobile behavior may not work as expected |
create-next-app + Solana wallet adapter packages | Yes (packages current on npm) | New projects on web3.js v1 | You wire the providers yourself, about ten minutes |
| Solana Kit + kit plugins | Yes, Kit is at 8.4.0 | New projects with no legacy code | Different API; Solana wallet adapter code doesn’t carry over |
Solana Kit or the Older Adapter: Which Should You Choose?
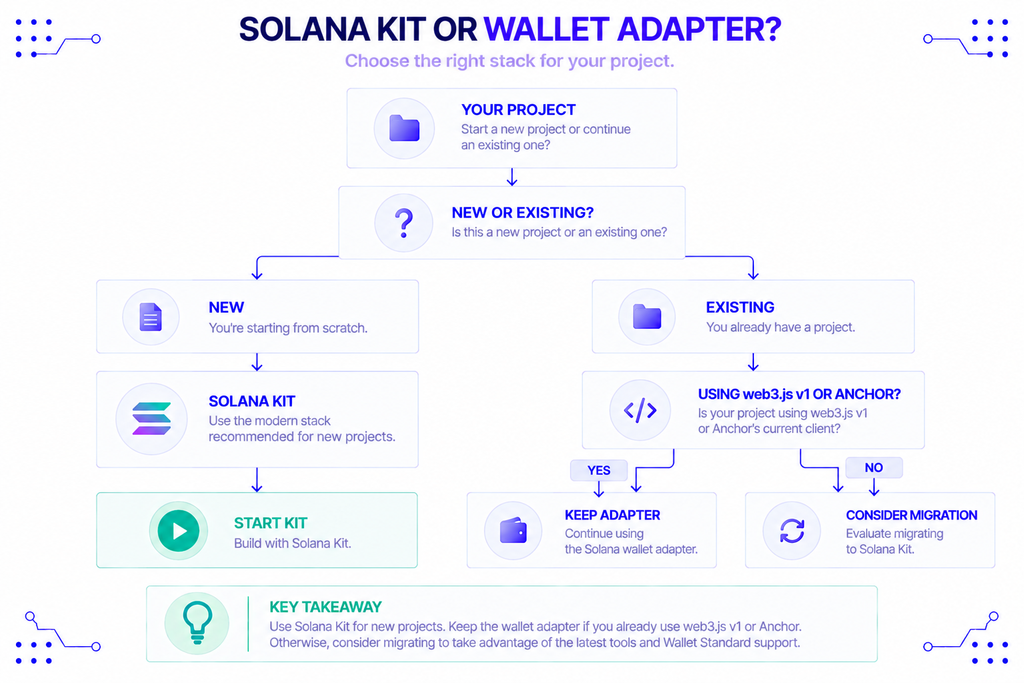
For a brand-new app, the Solana docs point to Kit. The frontend guide states that “Wallet Standard discovery (via @solana/kit-plugin-wallet) replaces wallet-adapter for modern wallets,” and its Next.js tutorial builds a connect-and-transfer app with @solana/kit, @solana/react and Node 20+.
That doesn’t make the Solana wallet adapter obsolete overnight. The migration page says the wallet-adapter repository “remains the reference” for apps still on that stack. Anchor is one reason to stay: per Solana’s September 10, 2026 changelog, its provider is still tied to web3.js.
A simple rule: keep the Solana wallet adapter if you already ship on web3.js v1 or Anchor’s current client, and start on Kit if you’re starting from zero.
Common Errors and How to Fix Them
Most first-run failures trace back to three causes, all listed in the repo’s FAQ or easy to reproduce.
| Symptom | Likely cause | Fix |
|---|---|---|
WalletNotConnectedError, “cannot destructure property” | Component sits outside the providers | Wrap the app in ConnectionProvider and WalletProvider |
signMessage is not a function | Optional method missing in that wallet | Feature-detect it, or use sendTransaction |
| HTTP 429 or slow reads | Public endpoint limit reached | Move to a private endpoint |
Conclusion
The Solana wallet adapter is still the fastest documented way to get users connected: four packages, three providers, one button. Set wallets to an empty array, build on sendTransaction, and move off the public endpoint before launch.
Decide on the stack first. Existing web3.js v1 or Anchor code means the Solana wallet adapter is the low-friction choice, while a fresh project deserves a look at Kit. Either way, treat the archived Scaffold as reading material.
FAQ
Do I need a separate package for each wallet?
No. Wallets that follow the Wallet Standard or Mobile Wallet Adapter protocol are detected automatically. Install a legacy adapter only for an older wallet that supports neither.
Does it work with mobile wallets?
Yes, through the Mobile Wallet Adapter protocol. The React package depends on @solana-mobile/wallet-adapter-mobile, and wallets that implement the protocol appear without extra code.
Is the library free to use?
Yes. It is open source under the Apache-2.0 license. Costs only appear if you add a paid endpoint provider.
Which Node.js version does it require?
Node 20 or newer. The current npm releases of the base, React, React UI and wallets packages all declare node >=20.