

Building a stablecoin in 2026 is no longer a fringe experiment. It’s a regulated financial product with a clear rulebook, proven code patterns, and a market worth more than $300 billion. The hard part isn’t the token contract anymore — it’s the reserves, the compliance, and the infrastructure that keeps the coin running once real money moves through it.
This guide walks the whole path, from what a stablecoin is to the exact steps to launch one. We’ll go from the basics up to the node infrastructure that decides whether your coin actually works in production. Citi projects the market could reach $1.9 trillion by 2030 in its base case, and as much as $4 trillion if adoption accelerates — so the timing question is really about execution, not demand.
What a stablecoin is, in plain terms
Before build a stablecoin, let’s talk in general what is it. A stablecoin is a crypto token designed to hold a fixed value — almost always $1. It does that by tying itself to an outside asset, usually dollars in a bank account or short-term government debt. You get the speed and openness of crypto without the price swings of Bitcoin or Ether.
Stablecoin: a blockchain-based token that keeps a steady price by pegging to a reference asset — fiat currency, commodities, or other crypto — and holding reserves or running a mechanism to defend that peg.
The word that matters here is peg. A peg is the promise that one token always equals one dollar, and the whole system exists to defend it. When a token drifts to $0.99, traders buy it cheap and redeem it for a full dollar from the issuer, which pushes the price back up. That simple arbitrage loop is what keeps a well-run stablecoin glued to its target.
The scale is already large. USDT (Tether) sits around $184 billion and USDC (Circle) around $73 billion, and together they hold roughly 83% of the market. This isn’t a niche corner of crypto anymore.
Who actually uses digital dollars, and why
Start with the people who need dollars but can’t easily get them. In much of Latin America, Africa, and Southeast Asia, a stablecoin is the cheapest dollar account someone can open. Sending USDT over Tron costs about a cent, while a traditional remittance can eat 5–7% of the transfer.
Businesses use them for treasury and cross-border settlement that clears in seconds instead of days. DeFi protocols use them as the steady unit traders park value in between bets. As Circle CEO Jeremy Allaire put it, stablecoins grew “out of the digital asset trading market” and are “now becoming a market for payments.”
That shift — from trading chip to payment tool — is why so many teams now want to create their own stablecoin. The demand is real, the rails are proven, and for the first time the law tells you exactly what you’re allowed to build.
The three models you can choose from
Before any code, you pick your stablecoin’s stabilization model. This one decision drives your capital needs, your smart contract design, and how regulators classify you. There are three, and they are not equal.
| Model | How the peg holds | Capital needed | Regulatory standing |
|---|---|---|---|
| Fiat-backed | 1:1 cash and Treasuries in reserve | High | Clear, favored |
| Crypto-collateralized | Overcollateralized crypto locked on-chain | Medium | Workable, more complex |
| Algorithmic | Software mints and burns to chase the peg | Low | Largely excluded |
Fiat-backed tokens: the market default
This is how more than 90% of all stablecoins work. For every token you issue, you hold one real dollar — in bank deposits, short-dated Treasury bills, or money market funds. Mint on deposit, burn on redemption, keep the reserves whole.
The appeal is simplicity and trust: anyone can understand “one token, one dollar in the vault.” The catch is that you need banking relationships, custody, audits, and enough starting capital to make the reserve yield worth it. USDT, USDC, and PayPal’s PYUSD all run this way.
Crypto-collateralized tokens: overcollateralized and on-chain
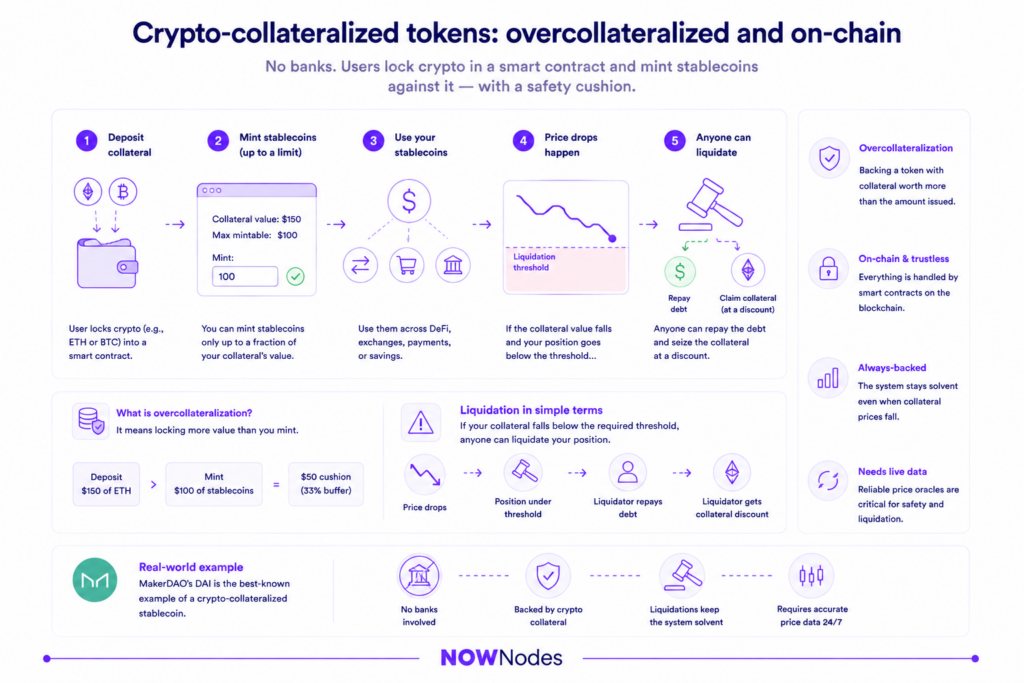
Here there’s no bank. Users lock crypto — ETH or BTC, say — into a smart contract and mint stablecoins against it, but only up to a fraction of the collateral’s value. Deposit $150 of ETH, mint up to $100, and the extra $50 is a cushion against price drops.
Overcollateralization: backing a token with collateral worth more than the amount issued, so the system stays solvent even when that collateral falls in price.
If the collateral drops too far, anyone can liquidate the position — repay the debt and claim the crypto at a discount. MakerDAO’s DAI is the best-known example. This model avoids banks entirely, but it leans on volatile collateral and careful liquidation logic, which means it needs live, accurate price data at all times.
Algorithmic tokens: why regulators shut the door
Algorithmic coins hold their peg with no real backing — software expands and contracts supply to chase $1. It works until confidence breaks. Then the mechanism asks people to buy in at exactly the moment everyone is running for the exit.
The market learned this the hard way. Terra’s UST reached $18 billion before collapsing in May 2022, wiping out around $60 billion in a matter of weeks. The whole algorithmic category has since shrunk to under $500 million, and the GENIUS Act now excludes these coins from the regulated payment framework outright. Unless you have a very specific reason, don’t build one.
The rules you have to design around
In 2026 the law comes before the code. Three frameworks now define the game: the GENIUS Act in the US, MiCA in the EU, and a set of Asian rules led by Hong Kong. They turned issuance from a gray area into a licensed activity, and they dictate features you must bake into your contract from day one.
What the GENIUS Act demands from issuers
President Trump signed the GENIUS Act into law on July 18, 2025 — the first US statute to define a payment stablecoin. It requires 100% backing with liquid assets like cash and short-term Treasuries, public reserve disclosures every month, and examination by an independent accounting firm.
It also shapes your smart contract directly. Issuers need the ability to freeze, seize, and claw back tokens to satisfy court orders and sanctions, so a compliant coin can’t be fully immutable or admin-less. Cross $10 billion in issuance and you fall under federal supervision from the OCC, Federal Reserve, and FDIC; below that line, a qualifying state regime can apply instead.
How Europe and Asia handle it
Europe’s MiCA regime took a parallel path: reserve assets are mandatory, and algorithmic models don’t qualify as compliant e-money tokens. Hong Kong’s Stablecoins Ordinance pushes one point further, requiring issuers to be able to move tokens between addresses on a court order — the clawback feature again.
The practical takeaway is the same everywhere. Pick your target jurisdictions early, because their rules decide what functions your contract has to include before you write a single line. Talk to a digital-assets lawyer here; this part isn’t optional.
Building your own token, step by step
Now the part you came for. Here’s how to build a stablecoin in practice — the full path to create your own stablecoin, from model to mainnet. None of these steps is skippable, and the order matters.
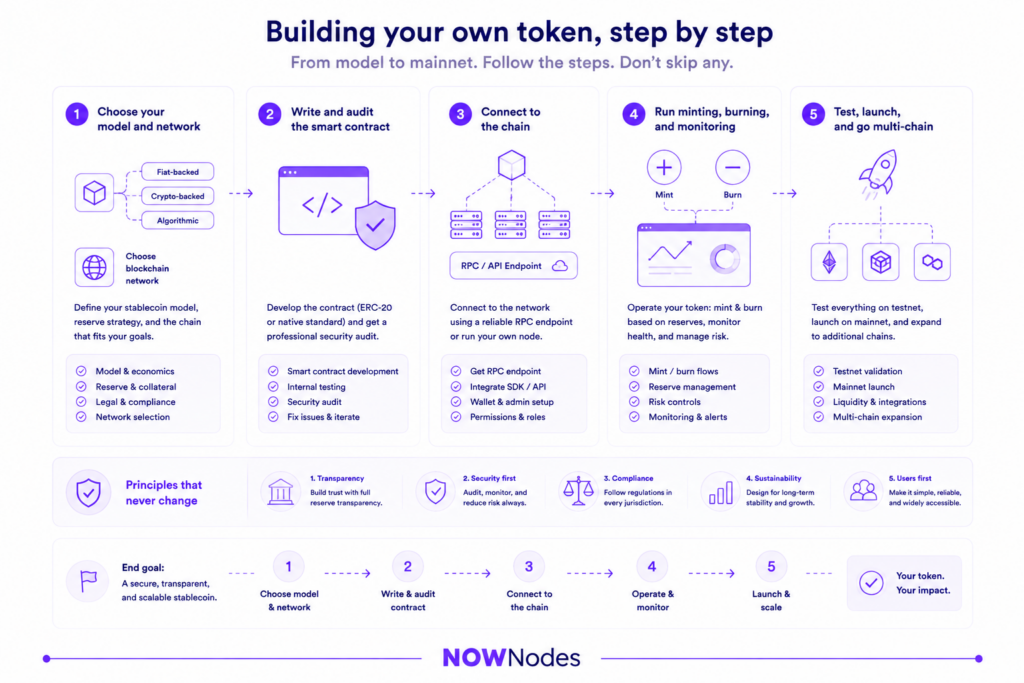
Step 1 — choose your model and network
Decide your model — almost certainly fiat-backed — and the blockchain you’ll launch on. Ethereum gives you the deepest liquidity and tooling. Tron carries more USDT than any other chain, over $80 billion, because its fees sit near a cent, and that’s exactly why it dominates payments. Solana and BNB Smart Chain are common picks when speed and low cost come first.
Match the chain to your use case, not to hype. A remittance coin belongs where fees are lowest; an institutional product belongs where compliance tooling is richest.
Step 2 — write and audit the smart contract
Your token is an ERC-20 (or the equivalent on your chain) with extra controls layered on. Don’t write it from scratch — start from OpenZeppelin’s audited contract libraries, which already secure billions in deployed value, and extend them with mint, burn, pause, and blacklist functions.
Those compliance functions aren’t optional extras; the GENIUS Act makes them prerequisites for issuance. Then get at least two independent audits from reputable firms before you touch mainnet. A thorough audit costs a fraction of a single exploit, so treat it as insurance, not a checkbox.
Step 3 — connect to the chain
Here’s the part most guides skip. A deployed contract does nothing on its own — every mint, burn, transfer check, and balance lookup is a call to a blockchain node. To read from and write to the chain, your backend talks to an RPC node.
You can run your own nodes, but that means syncing terabytes of data, handling upgrades, and holding uptime near perfect across every chain you touch. Most teams connect through a provider instead. NOWNodes gives you RPC and WebSocket access to more than 125 blockchains through a single API, on shared or dedicated nodes — the exact layer a live stablecoin leans on.
This reliability isn’t a nice-to-have. Two teams can ship the same contract, and the one whose nodes stay up during a volume spike wins — a coin that can’t confirm a deposit or broadcast a mint in a busy moment breaks its peg in public. NOWNodes already runs this layer for wallets and exchanges like Trust Wallet, Exodus, and CEX.IO, so if you’d rather not manage the nodes yourself, it’s a sensible piece to hand off.
Step 4 — run minting, burning, and monitoring
A stablecoin is a loop. Dollars arrive in the reserve and your system mints tokens; a user redeems and your system burns them. Every one of those actions is a signed transaction sent through your node connection, and every deposit has to reconcile against the reserve before you mint against it.
You also watch the chain constantly — for redemptions, for blacklisted addresses, for reserve proofs. WebSocket subscriptions push new blocks and events to you in real time instead of making you poll for them. Miss an event here and your books drift from your reserves, which is the one thing a stablecoin can never do.
Step 5 — test, launch, and go multi-chain
Rehearse everything on a testnet first — minting, redemption, freezing, the lot — with no real money at stake. Once it holds up, deploy to mainnet behind multi-signature wallets and timelocks so no single key controls the supply.
Most successful stablecoins don’t stay on one chain. Launch on your primary chain, get the operations right, then expand to where your users actually are, reusing the same node provider to reach each new chain instead of rebuilding your infrastructure every time.
Build it yourself or use a white-label provider?
You don’t have to build everything. White-label issuers like Paxos and Coinbase can get you to market in months with compliance already handled — Coinbase’s version simply wraps USDC in your branding. You trade control for speed and a lighter regulatory lift.
Choose to create your own stablecoin from scratch when you need something they won’t support: a unique mechanism, a specific jurisdiction, proprietary features, or economics that only make sense at $10 billion-plus scale. Plenty of teams split the difference, letting a provider handle reserves and compliance while they build the wallet, the app, and the node connections that shape the actual user experience.
The honest takeaway
Building a stablecoin in 2026 is a solved problem on paper: the models are known, the code is audited, and the law finally spells out what to build. What separates a coin that works from one that stalls is execution — real reserves, real audits, and infrastructure that stays up when volume spikes.
Get the model right, build compliance in from day one, and treat your node layer as core infrastructure rather than plumbing. Whether you issue your own stablecoin from scratch or wrap an existing one, the token is only as reliable as the chain connection behind it. That’s the part NOWNodes is built to carry.
FAQ
How much does it cost to launch one?
It varies widely. Smart contract development plus two audits can run from tens of thousands to a few hundred thousand dollars. The bigger cost sits in reserves and compliance — banking, custody, legal, and monthly attestations — which is why fiat-backed issuers need serious starting capital before they go live.
How long does it take from idea to mainnet?
A custom build usually takes several months to a year once you account for audits, legal work, and banking setup. White-label providers can compress that to a few months by handling reserves and compliance on your behalf.
Do I need a license to issue a dollar-pegged token?
In most serious markets, yes. The GENIUS Act, MiCA, and the Asian frameworks treat issuance as a licensed activity with reserve and disclosure duties. Requirements scale with size, so confirm them with a digital-assets lawyer for your specific jurisdiction.
Is issuing one actually profitable?
It can be. Fiat-backed issuers earn interest on their reserves — a $10 billion coin can generate $400–500 million a year at current Treasury rates — but regulations bar passing that yield to holders, and you need large scale before it outweighs the running costs.
Can a single person launch one?
Technically you can deploy a token alone, but a compliant, usable one needs legal, banking, audit, and infrastructure support. Solo deployment is fine for a demo; a real product is a team effort.