As the concern about the privacy and security of blockchain technologies and cryptocurrencies continues to gain momentum, leading projects such as Monero are always here to solve this problem! To stay privacy-centric, Monero uses various cryptographic primitives: ring signatures, stealth addresses, Pedersen commitments, and more.
To be a part of this brilliant decentralized and military-level secure network you need to gain access to the Monero node. There are two primal ways to do it: running your own Monero full node and connecting to the Monero Remote Node with the help of third-party providers just like NOWNodes. That’s why today we are going to unveil both of these methods. Read till the very end to learn how to do it!
The Role of Nodes In Monero Network
A Monero (XMR) node is a peer-to-peer (P2P) program that keeps the blockchain network synchronized with the network at large.
Nodes are the backbone of the Monero network. You can think of a Monero node as a device on the internet that runs the Monero software. This features a full copy of the Monero blockchain and is actively assisting the overall Monero Network.
Nodes are intended to participate within the Monero network and to secure the transactions through the procedure of enforcing the rules within the network.
They can download the entire blockchain to know what transactions have taken place. Furthermore, they can even contribute to the network by participating in the procedure of creating blocks, otherwise known as mining.
This means that through the utilization of a Monero node, you can get access to block height, transaction status, wallet balances, and other comprehensive and sophisticated data.
Monero Full Node vs Remote Node
A node that is not running on a local machine is known as a remote node, and remote nodes can be private if they are only available for personal use or open if they are accessible by other people. A remote node runs on a distinct machine different from the one where the Monero wallet is located.
So the main differences between Monero’s full and remote nodes can be translated as:
- A Monero full node stores the entire blockchain data and verifies all transactions independently. Running a full node provides you with the highest level of privacy and security when transacting in XMR.
- A Monero remote node, on the other hand, allows users to interact with the Monero network without downloading and storing the full copy of blockchain data on their devices.
Additionally, it is useful to realize the key differences between public and private Monero remote nodes to have a better understanding of how the Monero network works.
- Monero private remote nodes: A private remote node operates on a separate machine, such as a VPS or dedicated server, rather than your own computer. Despite its remote location, you maintain complete authority over its functions. This setup gives you the flexibility to transform it into an open node if you choose, allowing others to access it.
- Monero open remote nodes: Open remote nodes are a perfect solution for people who, for various reasons such as hardware limitations, lack of disk space, or technical knowledge, decide to stay away from deploying their own node. Instead, they rely on these publicly accessible nodes within the Monero network.
Open remote nodes can be provided by the individuals sharing their node with the community or by node provider companies like NOWNodes. Open nodes are amazing because, as was stated before, allow people who are not running their own node to have instant access to the Monero network.
How to Connect to the Monero Remote Node with NOWNodes
Joining the NOWNodes party is a great opportunity to join XMR blockchain or to lighten your crypto infrastructure.
NOWNodes is a trustworthy blockchain-as-a-service solution that lets users get access to Full Nodes and Blockbook Explorers via API. Thousands of developers have already enhanced their crypto projects with NOWNodes, now it’s your turn!
We have Service Quality Standards available for all partners. By utilizing NOWNodes for your Monero development needs you can be assured that Your nodes are under 24/7 surveillance. They are constantly being updated according to every major upgrade coming to the blockchain networks. That way, our clients can enjoy the scalability for any large tasks, and blazing-fast API responses that equal tiny parts of the seconds.
Your connection to the Monero Remote Node was made as easy and secure as possible by NOWNodes. Here are the simple steps on how you can access it:
- Visit the NOWNodes website (nownodes.io) and sign up for an account using only your email address and a password.
- Choose a tariff plan that fits your web3 development needs. There are various tariff plan options including a START FREE plan.
- If you’re willing to start with a free plan, make sure to add the XMR to the list of 5 blockchain networks available on this plan.
- If you are ready to go on with the PRO plan or higher, you can access any node out of 100 nodes that NOWNodes has to offer, including some additional features such as WSS, Tendermint, and Webhooks.
- On the “DASHBOARD” page find the “ADD API KEY” button and generate your API key.
- Finally, when the registration process is complete, it’s time to make some requests!
- Use the provided Monero endpoint xmr.nownodes.io and your API key to interact with the blockchain.
How to Set Up a Monero Full Node
If you’re a man who always chooses the hardest path, here’s the walkthrough for you. The step-by-step guide on how to run a Full Node is presented below. So, let’s start by releasing the requirements.
Hardware Requirements:
- Decent amount of storage: At least 100 GB+ of free disk space
- Better to have more as it will grow over time (might even take TBs)
- Memory (RAM): At least 4 GB of RAM is recommended.
- A stable internet connection with at least 100Mbps bandwidth.
- Monthly bandwidth use can vary from about one hundred gigabytes per month to several terabytes.
- Processor (CPU): A modern multi-core CPU (e.g., Intel i3/i5/i7/i9, AMD Ryzen)
Software Requirements
- Operating System: Windows, Mac, and Linux.
- Linux Ubuntu is often preferred for its stability and performance, but choose an OS you’re comfortable managing.
- Monero Daemon (
monerod) is essential for running a full node. - Repository From the Moneros Github (here)
- Monero node binaries to interact with the node by using CLI commands
Once you’ve met the requirements, you’re ready to run a Monero Full Node. Further in this guide we’ll explain how to do it with Linux. If you’re seeking for additional or alternative information there are many user guides on Monero official website that you can explore (here).
Step 1. Configure your ports and firewall
There are two initial ports for the Monero node to connect to 18080 and 18089. The difference between them and the use cases for specific needs are described in the image below.
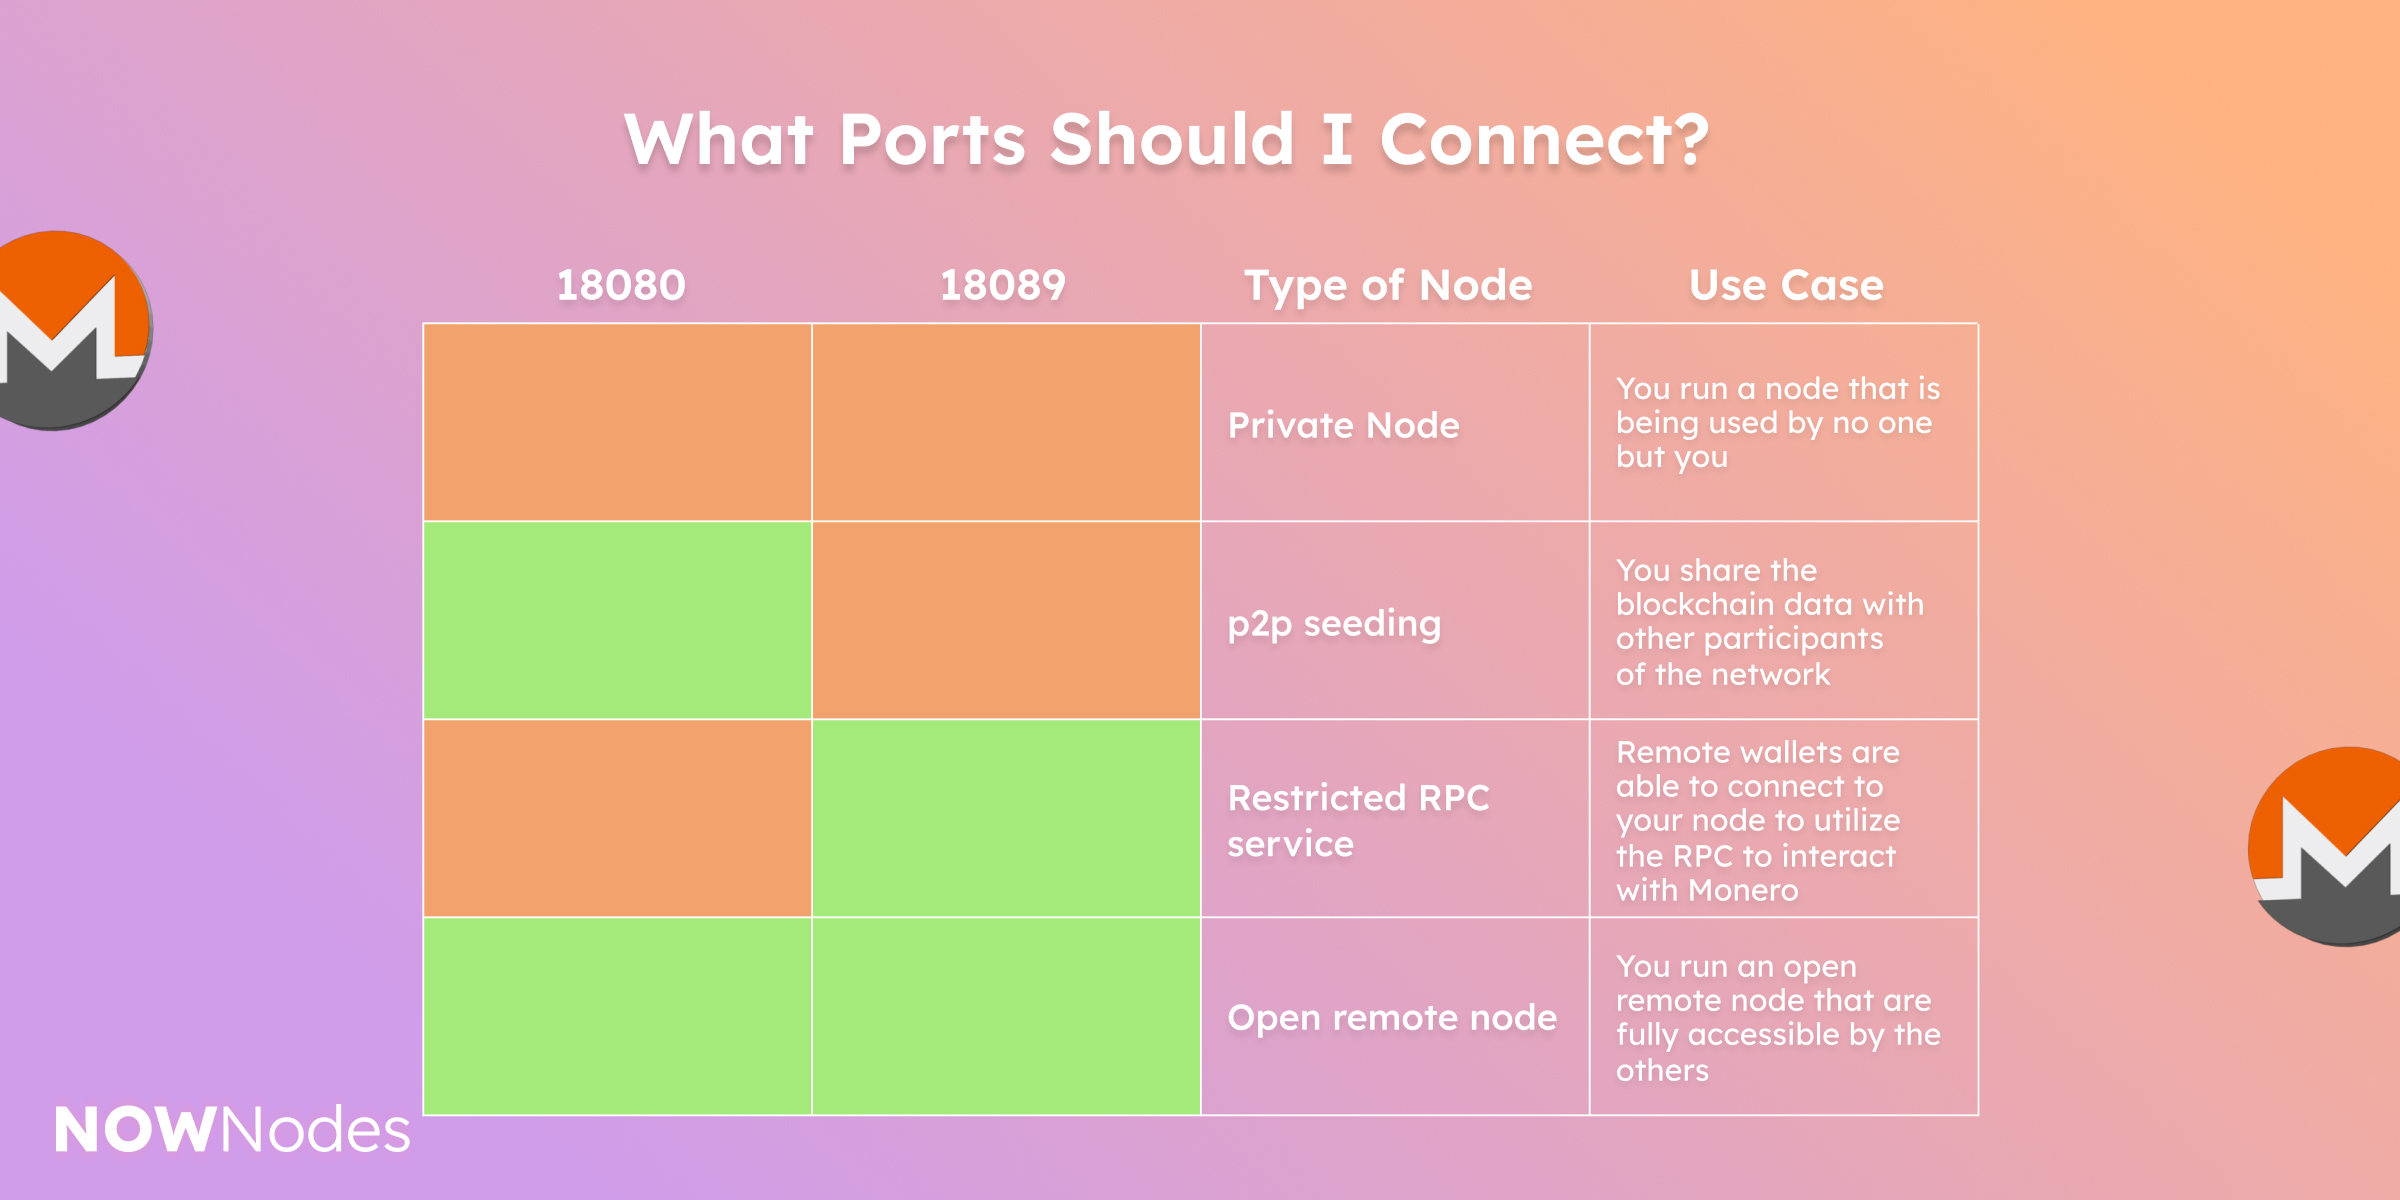
Make sure that port 18080 is open as monerod uses this port to communicate with other nodes on the Monero network.
# By default, deny all incoming and outgoing traffic
sudo ufw default deny incoming
sudo ufw default allow outgoing
# Allow ssh access
sudo ufw allow ssh
# Allow monerod p2p port
sudo ufw allow 18080
# Allow monerod restricted RPC port
sudo ufw allow 18089
# Enable firewall
sudo ufw enable
# Verify status
sudo ufw status numbered
This is the full public node with port 18089, a restricted PRC port.
Then you have to set up the service accounts:
# creates system user account for monero service
sudo adduser --system --no-create-home --user-group monero
This command creates a system user named monero without a home directory (--no-create-home). Running the Monero node under a dedicated system user rather than a regular user or root enhances security.
Step 2. Create Directories
Then, you need to create some folders the service needs and set their ownership:
# logfile goes here
sudo mkdir /var/log/monero


# blockchain database goes here
sudo mkdir /var/lib/monero


# create file for config
sudo touch /var/lib/monero/monerod.conf


# set permissions to service account
sudo chown -R monero:monero /var/lib/monero
sudo chown -R monero:monero /var/log/monero
These commands create dedicated directories for Monero’s logs (/var/log/monero) and blockchain data (/var/lib/monero). Organizing files in this manner helps in managing and securing data. Using standard directories like /var/log for logs and /var/lib for application data is a common Linux convention, enhancing clarity and consistency across systems.
Step 3: Download the Latest Monero Binaries
To do this, type in the following command:
cd $HOME
wget --content-disposition https://downloads.getmonero.org/cli/linux64
Afteer that, you will need to verify the download hash signature.
#download latest hashes.txt file
wget https://www.getmonero.org/downloads/hashes.txt
#search hashes.txt file for the computed sha256sum
grep -e $(sha256sum monero-linux-x64-*.tar.bz2) hashes.txt
This command fetches the official list of cryptographic hashes from the Monero website. These hashes are used to verify the integrity and authenticity of the downloaded Monero software. Note that a match appears, and this confirms that the file is valid.
Then, you need to extract tar and copy it to /usr/local/bin
tar -xvf monero-linux-x64-*.tar.bz2
sudo mv monero-x86_64-linux-gnu-*/* /usr/local/bin
sudo chown -R monero:monero /usr/local/bin/monero*
The final substep here is to clean up the files. To do so, enter the following command:
rm monero-linux-x64-*.tar.bz2
rm hashes.txt
rm -rf monero-x86_64-linux-gnu-*/
Step 4: Configure the Monero Node with a Configuration File
The next crucial step is to add a Configuration File. Using this specific configuration for running a Monero full node on Linux sets various operational parameters that affect how your node interacts with the Monero network, handles data, and manages resources. Here’s the example of what you should ad to the configuration file:
#blockchain data / log locations
data-dir=/var/lib/monero
log-file=/var/log/monero/monero.log

#log options
log-level=0
max-log-file-size=0 # Prevent monerod from managing the log files; we want logrotate to take care of that

# P2P full node
p2p-bind-ip=0.0.0.0 # Bind to all interfaces (the default)
p2p-bind-port=18080 # Bind to default port
public-node=false # Advertises the RPC-restricted port over p2p peer lists

# rpc settings
rpc-restricted-bind-ip=0.0.0.0
rpc-restricted-bind-port=18089

# i2p settings
tx-proxy=i2p,127.0.0.1:8060

# node settings
prune-blockchain=true
db-sync-mode=safe # Slow but reliable db writes
enforce-dns-checkpointing=true
enable-dns-blocklist=true # Block known-malicious nodes
no-igd=true # Disable UPnP port mapping
no-zmq=true # ZMQ configuration

# bandwidth settings
out-peers=32 # This will enable much faster sync and tx awareness; the default 8 is suboptimal nowadays
in-peers=32 # The default is unlimited; we prefer to put a cap on this
limit-rate-up=1048576 # 1048576 kB/s == 1GB/s; a raise from default 2048 kB/s; contribute more to p2p network
limit-rate-down=1048576 # 1048576 kB/s == 1GB/s; a raise from default 8192 kB/s; allow for faster initial sync
By using this configuration you allow your Monero node to accept connections on all network interfaces, enables blockchain pruning (if you want your node to be archival just use the prune-blockchain=false or simply ignore this line), as well es set up needed settings such as bandwidth settings, RPC connection settings, proxe and much more.
Once you’ve set up your config file you need to create a monerod.service systemd unit file. So, the next substep is about creating a systemd service file for running the Monero daemon (monerod) as a system service on Linux. Here’s how you can create a monerod.service file and set it up correctly:
cat > $HOME/monerod.service << EOF
[Unit]
Description=monerod
After=network.target

[Service]
Type=forking
PIDFile=/var/lib/monero/monerod.pid
ExecStart=/usr/local/bin/monerod --config-file /var/lib/monero/monerod.conf --detach --pidfile /var/lib/monero/monerod.pid
User=monero
Group=monero
Restart=always
RestartSec=5

[Install]
WantedBy=multi-user.target
EOF
After creating this file, you would typically move it to /etc/systemd/system/ to make it available as a system service. Then, you can use systemd commands to start, stop, enable (start on boot), or disable the service, like so:
- Starting a Service: sudo systemctl start monerod.service
- Stopping a Service: sudo systemctl stop monerod.service
- Enabling a Service: sudo systemctl enable monerod.service
- Disabling a Service: sudo systemctl disable monerod.service
- Checking Service Status: sudo systemctl status monerod.service
- Restarting a Service: sudo systemctl restart monerod.service
Conclusion
Hopefully, now you have a higher level of understanding when it comes to manually run a Monero (XMR) node, as well as regarding all of the various advantages you get by simply doing so. If the process seems a bit intimidating for you at first, remember that you can always connect to a pre-configured node with NOWNodes. All of the nodes are maintained 24/7, have an uptime of 99.95%, and you can connect to them in less than a second.
Through a Monero node, you can get access to all of the advantages that are offered by it and can secure the network, get access to a high level of privacy, and be a part of the overall ecosystem.
We hope that this guide was helpful. Please let us know it by leaving your feedback in our Telegram Builders Community or just by hitting our DMs at X/Twitter. Moreover, if you’re interested in some alternative ways to run a Monero full node such as with Docker ar MacOS feel free to ask our teem to make some updates to the guide and we would be happy to uncover this topic from different perspectives. 🙏